
 Translate
King County iMap
iMap is an application that allows you to view King County spatial information (GIS data and images) in an interactive map display. You can customize your map display to show just the information you want to see at the best scale for your chosen purpose. iMap is your window to a wealth of geographic information from throughout King County on such topics as real property, natural resources, political boundaries, planning, and much more.
iMap Guide
Getting Started with iMap
Search for a location
Try entering an address into the Basic Search box in the upper left. One or more selection options may appear as you type. Basic Search can also find parcel numbers, street intersections (use an ampersand between street names like this: 80th & Roosevelt), and common destinations and landmarks, such as parks and schools.
Look up property information
Zoom to an address or parcel number using Basic Search, then click on a red-outlined parcel to see a pop-up with property information. (The parcels layer is turned on by default when you first launch iMap Beta.)
Explore different map layers
There are more than a dozen theme-based layer groups to choose from in the Layer List. (Look for the Layer List icon in the icon group in iMap's title bar.) Expand a layer group by clicking on its name. Display or hide layer groups and individual layers by clicking the check boxes next to their names. Important: a layer group needs to be checked on in order to see any of the individual layers in that group display on the map.
Try different basemaps
Changing the basemap that displays in the background of your map view is as easy as opening the Basemap Gallery and then clicking on one of the map thumbnail images. (Look for the Basemap Gallery icon in the icon group in iMap's title bar.) In addition to a standard basemap made with authoritative King County data, there are several vintages of aerial photo imagery, a hillshade basemap that represents landforms, and several third-party basemaps, including OpenStreetMap.
iMap Interface
Here are some basic instructions to help you get started with iMap. We welcome your questions and feedback to our mailbox which is monitored during business hours: giscenter@kingcounty.gov.Home Button 
Click or tap the Home Button in the upper left of the map window to zoom the map to all of King County.
Find My Location Button 
The Find My Location Button in the upper left of the map window will use your browser's geolocation capabilities to zoom the map to the detected location of your device. This feature is designed for mobile devices such as smartphones and tablets (it can produce some interesting results on desktop computers connected by wire to the Internet).
Basic Search
Basic Search using the entry field in the upper left of the map window lets you search for a location by address, street intersection, place name, or parcel number. As you type your entry, the search engine will suggest matches that it finds in a King County database of locations. Use the & symbol to separate street names for an intersection search.Enhanced Search 
Use the Enhanced Search in the iMap toolbar for more search options and to select map features.
Basemap Gallery 
Use the Basemap Gallery in the iMap toolbar to select a basemap that best meets your needs. The set of more than a dozen choices includes standard basemaps with streets, cities, parks, etc., aerial photography from many different years, topography, lidar-based hillshading, and more.
Although many of the basemaps comprise multiple layers of information, they are for viewing only. You cannot interact with the layers that make up a basemap like you can with the layers you see in iMap's Layer List panel.
Add Data 
AddData_button
The Add Data tool lets you add data from a variety of sources to your iMap session. The data can come from web services or, if under 1,000 records, may come from a local file. The added data layer will act like most other layers, but is only available during your current iMap session. Accepted web service and file types are listed in the tool.
Share 
The Share Tool helps you share your current iMap state by creating a URL with parameters that capture the current extent, zoom level, etc. You can copy the link to send via email or share on social media.
Bookmark 
The Bookmark Control in the iMap toolbar lets you save your place on the map so you can easily return to it later. Just open the Bookmark Control panel by clicking or tapping the icon and then type in a name that describes the location in your current map view. If you need to remove a bookmark, click on the bookmark and a delete button will appear.
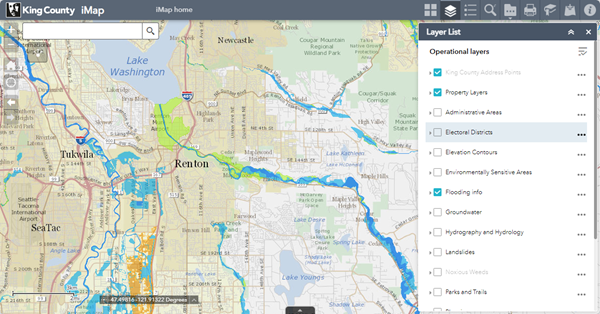
Layers 
The Layer List panel is where you can access the wide variety of GIS layers provided though iMap. “Operational Layers” in the heading means that you can interact with them (unlike basemap layers).
Each item in the Layer List is either a map layer or group of layers and has an expand/contract arrow followed by a checkbox for visibility, the layer or group name and then an ellipsis to access a mini-menu.
The mini-menu gives you control of the layer or group transparency and also lets you move it up or down in the list. The order in which items are listed is also the order in which they are drawn on the map.
If the item is a group of layers, clicking the expand arrow will open the group to show all of the map layers it contains. Each layer will have its own expand arrow, visibility checkbox and mini-menu. The layer's expand control reveals the layer's map symbology, while the mini-menu allows you to open up the layer's attributes in the “attribute table.” You cannot change the order of layers within the group.
Tip: If you turn a layer on and don't see it draw on the map, make sure that the group visibility is turned on too. If it still doesn't draw, you may need to zoom in some more on the map. That's because many of the layers contain so much detailed information they are not designed to draw unless one is zoom in to a fairly large scale.
Legend 
Click or tap the Legend icon to open a panel that shows the map legend for all visible operational layers. Only layers that are actually being drawn on the map appear here. For example, if you have the parcels layer turned on but your map is zoomed out to the entire county, parcels will not draw on the map or appear in the legend until you zoom in more.
How do I...
- Launch iMap.
- Click or tap the Layer List icon in the header bar.
- Turn on the "Flooding Info" layer group by clicking or tapping the checkbox next to its name. You can expand the layer group by clicking or tapping the arrow to the left of the checkbox to verify that the layer "FEMA preliminary 100-year floodplain" is turned on.
- Enter the address of the property you are checking into the Basic Search entry field in the upper left corner of the map. Then click or tap the address in the drop-down list that appears, or the magnifying glass icon; the map will zoom to the address. Instead of entering an address, you could just pan and zoom on the map to focus on your area of interest.
- Visually inspect the map to see where the property lies in relation to the floodplain. If the property is far outside a floodplain, you might need to zoom out to see the nearest floodplain. Also, the "Parcels" layer is turned on by default when you launch iMap, so you should see the parcel boundary for the property you are checking. (If not, go to the "Property Layers" layer group in the Layer List, and turn on the Parcels layer.) Click inside the parcel boundary on the map to highlight the parcel and confirm.
The Cursor Coordinates Tool, which is located along the left lower edge of the map (just to the right of the Scale Bar), shows the latitude and longitude in decimal degrees for the current location of your cursor. The coordinates display is dynamic—as you move your cursor, the coordinates will keep changing.

If you want to note the coordinates of a specific point on the map, the coordinates tool will display the coordinates for that point, and the coordinates will be frozen until you click on the map again.
To return to displaying cursor coordinates dynamically, just click on the cursor coordinates icon again.
If you hover your mouse over the small blue arrow just to the right of coordinates, you will see an option to switch to displaying State Plane coordinates. (The full coordinate system name is shown, i.e., NAD_1983_HARN_StatePlane_Washington_North_FIPS_4601_Feet. This is the coordinate system in which King County GIS data is stored, EPSG 2926). Eastings and northings in feet are displayed in that order. State Plane coordinates cannot be displayed dynamically. To return to dynamic coordinates display when in State Plane mode, hover over the blue arrow again and select the Mercator option (full name: WGS_1984_Web_Mercator_Auxiliary_Sphere).
iMap does not provide the ability to place a point on the map at a specific coordinate location.
If you want to save or send an iMap link that will automatically make iMap zoom to a particular map extent, all you have to do is copy the URL from the address bar in your browser because iMap updates the URL string every time you pan and zoom on the map. Here is what a typical URL looks like.
https://gismaps.kingcounty.gov/iMap/?center=-13617790%2C6040362&scale=1128.497176&
If you want to use specific latitude/longitude coordinates, you can write your own URL string using the following format.
https://gismaps.kingcounty.gov/iMap/?center=[longitude],[latitude]&level=[integer zoom level]
Replace the bracketed items with your own values (and don’t include the brackets). Use decimal longitude and latitude values. The parameter called "level" sets the zoom level/map scale. The valid levels in iMap range from 7, which is zoomed all the way out, to 20, which is zoomed all the way in.
Here’s an example for longitude 122.330805 degrees west (west requires a negative value) and latitude 47.598794 degrees north.
https://gismaps.kingcounty.gov/iMap/?center=-122.330805,47.598794&level=17
Another URL parameter you can use is parcel number. The name of the parameter is "pin." Here’s an example that directly links to parcel number 5247800795.
Did you know that you can enter latitude and longitude coordinates in the Basic Search entry field (located in the upper left corner of the map)? Yes you can, and that's how you can make the map zoom to specific coordinates. But the trick is to enter longitude first and then latitude separated by a comma or semicolon, as in the example below.

iMap User Questions
Q. I can't find the map layer I want to see.
A. There are currently more than 100 map layers in iMap collected into over a dozen thematic layer groups. When you open the Layer List panel you see the layer group names. Click or tap any one of them to expand a list of individual map layers that are collected in that group.
Q. I see the map layer I want to view in the Layer List, but it doesn't appear on the map.
A. In order to be visible, an individual map layer needs to be checked on AND the layer group that it is part of also needs to be checked on.
Q. I want to be able to zoom in more to see more detail. Can you make iMap do that?
A. iMap has fixed-scale map zoom levels and each zoom changes the map scale by a factor of two. We have added one larger-scale zoom level since iMap's launch and we don't have any immediate plans to add more. However, the current maximum zoom level corresponds to the full resolution of the 2013 aerial imagery basemap, so zooming in more would not reveal any additional photo detail.
Q. I'm trying to use the Print tool, but I get an error every time I try to create a map print.
A. Try reloading iMap. In our testing, this has fixed such problems.
Q. The printed map extent does not match the viewer map extent.
A. Select the "Advanced" options on the Print panel, under "Map Scale/extent" select "Preserve map extent," and then try a new map print.
Q. The basemap doesn't appear in my print map.
A. This may occur when the map view is at the maximum zoom level. Select the "Advanced" options on the Print panel, under "Map Scale/extent" select "Preserve map extent," and then try a new map print.
Q. I created a print map and it shows an area entirely different from what I expected, or it shows a print map I created earlier instead of the one I just created.
A. We are researching this occasional glitch. If this happens, please try creating your print map again. If you have any print maps in your list, you might want to clear them using the "Clear Prints" button.
Q. When I launch iMap all I get is a blank screen. Why?
A. We have had reports like this from some users of Internet Explorer and it is usually due to a security setting in Internet Explorer. The problem can usually be solved by opening the browser's Internet Options, selecting the Security tab, and adding the iMap URL (https://gismaps.kingcounty.gov/iMap/) to Trusted Sites. One must have administrator privileges on the computer in order to make this change. Alternatively, try different web browser.
Q. I no longer find links to the Assessor's Report and the Districts and Development Report.
A. If you do a basic search for an address, iMap will zoom in to a location and a pop-up will confirm the address. But you must then click on a parcel in order to see a pop-up that displays information about that parcel, including the familiar links to the Assessor's Report and the Districts and Development Report. Alternatively, if you do an Enhanced Search for a parcel, the result displayed in the Enhanced Search panel will include two buttons, one for each of the reports.